
In this hands-on aviation geography lesson, students will explore aviation sectional charts to learn how pilots plan cross-country flights. They will use the sectional legend to identify symbols, measure distances between airports, and select visual checkpoints (like rivers, roads, or towers). Students will then “fly” their planned route virtually using Google Earth’s flight simulator.

Learning Targets & Objectives
In the completion of this lesson, students should be able to:
- Read an aviation sectional chart and legend.
- Identify landmarks and symbols used in aviation.
- Measure distances between two points on a map.
- Use digital tools to virtually explore a flight route.
Student Baseline Knowledge & Skills
Students should:
- Be able to read a basic map or use a map key/legend.
- Have basic measurement skills (inches, miles)
- Have familiarity with using a computer or tablet.
- Be comfortable working in pairs or small groups.

Formative Assessment
- Students will complete DreamFlight's simplified "Flight Navigation Log" worksheet, which includes mapping a start and end point/airport for each leg of flight, identifying 3-4 visual checkpoints per leg (rivers, towers, highways, etc.), and calculating estimated distances between checkpoints.
- Teacher observation during group or partner work.

Materials & Resources
- DreamFlight's "Navigating the Skies" Video
- DreamFlight's Sectional Chart
- DreamFlight's "Flight Navigation Log (Basic)
- DreamFlight's "Flight Navigation Log (Intermediate - Optional)
- Printed Aviation Scaled Rulers
- Pencils
- Computers with Google Earth Pro Access (Google Earth Flight Simulator is not available on tablet/browser versions).
Lesson Procedure
- Introduction & Hook (5-10 Minutes)
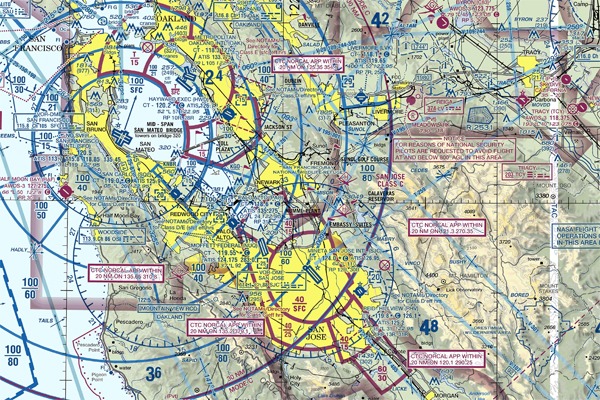
- Show a sectional chart and ask:
- “What do you think pilots use this for?”
- “How do they find their way across the sky without a road?”
- Show DreamFlight’s “Navigating the Skies” video, providing a brief overview of aviation sectional charts and how they are used by pilots.
- Introduce the challenge: “Today, you are all flight planners! You’ll chart a 3-leg route and figure out how far you’ll be traveling while finding visual markers to keep you on route!”
- Show a sectional chart and ask:
- Mini-Lesson: How to Read a Sectional Chart (10-15 Minutes)
- Review key sectional legend symbols: airports, towers, roads, rivers, and VFR waypoints.
- Demonstrate how to find a landmark using the chart.
- Show how to use a sectional ruler to measure distance (nautical miles).
- Group Flight Planning Activity (25-30 Minutes)
- Students may work in pairs or small groups.
- Each group will plot a 3-leg route from Capital City Airport > Cynthiana Harrison County Airport > Samuels Field (Bardstown) > Capital City Airport.
- Using the chart:
- Plot the route and draw course lines.
- Identify 2-3 visual checkpoints per leg (using legend/symbols).
- Measure the distances between each checkpoint.
- Record everything on the “Flight Navigation Log” worksheet.
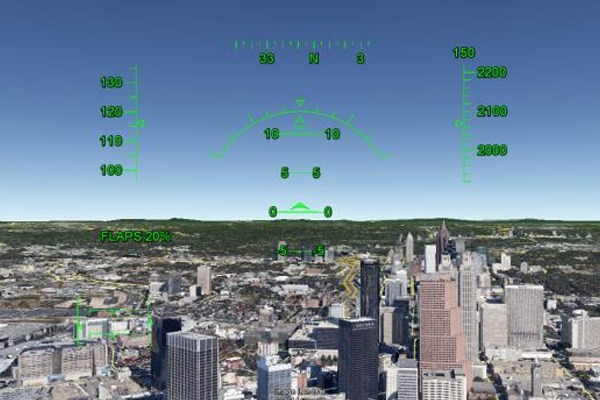
- Virtual Flight Exploration (20-30 Minutes)
- Have students open Google Earth Pro and zoom into their flight plan (you may want to have different groups start on separate legs and only fly a single leg, depending on time).
- Have students zoom in on the map until they are roughly 2,000′ above the ground (reference measurement in the bottom right portion of the program window).
- To start the simulation, press Ctrl+Alt+A. Students can either select an F-16 or Cirrus SR-22 aircraft for flight.
- Helpful Tip: Aircraft can be controlled by either a mouse or arrow keys on a keyboard. We have found that the mouse works best. Please also note that control movements are inverted as they would be with a control yoke (i.e., moving the mouse down pitches the airplane’s nose up, vice versa).
- Students should describe what they see at each checkpoint and whether it matches their navigational log.
- Have students open Google Earth Pro and zoom into their flight plan (you may want to have different groups start on separate legs and only fly a single leg, depending on time).
- Sharing and Reflection (5-10 Minutes)
- Ask students to share some of their chosen visual checkpoints. What made a good checkpoint?
- Ask students to share some of their chosen visual checkpoints. What made a good checkpoint?
- Optional Extensions:
- Use DreamFlight’s Intermediate version of the Flight Navigation Log worksheet (along with partnering video) to implement time/distance/speed and fuel burn calculations.
- Have students complete a leg of their planned course on one of DreamFlight’s mobile flight simulators alongside an introductory ground school lesson detailing aircraft controls.
Looking to take this experience to the next level? Learn more about DreamFlight Charities’ AVCamp program, which looks to bring the wonders of flight to even the most remote parts of the state!